Wednesday, January 26, 2011
Free Victorian Books
These are from the illustrated bible, from 1872, it has over 300 engravings!
Download free from Google Books Here.
Just found this great dictionary free at this amazing site! Internet Archive, they have tons of free ancient books to download also, plus its free to have a membership.
Wednesday, January 12, 2011
Saturday, January 8, 2011
19th century little girls mourning dress
The photo's on that site are poor quality so it is hard to make out fine details.
Friday, January 7, 2011
1880 Victorian Childrens style bodice
This is a pattern for a bodice from 1880 for an adult from Katherine's Dress Site
Here is the picture she took of the original
http://www.koshka-the-cat.com/bustle_bodice.html
I altered the pattern to be considerably narrower at the hips removed the bustle fit and removed the tabs for a very simple hem line.
Here is my version of it as a children's style bodice [made to be worn without a bustle]
Collar and cuff detail.
Here are very rough sketches of the simple alterations I made to Koshka the Kat's bodice pattern to bring in the hips to remove the bustle fit.
Wednesday, January 5, 2011
Victorian cosmetics, homemade cosmetics & skincare
Punch, 27 January 1894
As far as cosmetics go there really wasn't much to choose from back then. You had face powder that was either talc or a starch and for rouge there was carmine [insect derived red pigment] or plant pigments such as beets or that from petals, that was added to salves or balms made from lard or tallow to use on lips and cheeks.
The eyeshadow [lead powder] or white pigmented face creams where still toxic & most considered they were only to be worn by actress's or prostitutes. As Queen Victoria was not fond of cosmetics that dutifully trickled down through her loyal subjects and plebes.
I've read some used burnt match sticks for eyeliner which is essentially charcoal.
links for research:
beautifulwithbrains.com
thevictoriangarden.co.za
the-cup-that-cheers.blogspot.com
fashion-era.com
erasofelegance.com
victorianpage.com
Speaking of skills devalued by mechanization, how about homemade cosmetics and skin care
I've been looking into making soap & skincare.
Here I have made some "handwax" for my dried up overworked hands. After I wash dishes and my hands are still warm I pick up the bar and rub it about a little then rub the rest into my hands. There's no drying alcohols like in liquid lotions and it stays on my skin keeping it soft longer.
Here is the lotion bar "handwax" coming out of it's mold
I keep my handwax bar in an old Altoids tin.
My 'NotVaseline' recipe
1 3/4 cup cold pressed olive oil
1/4 c. unrefined peanut oil [natural source of Vit E for skin health]
1/2 c. beeswax
amber oil
I heated the beeswax and oils [not the amber oil] for about 10 minutes stirring. Warmed the amber after pouring my 'NotVaseline' into the jar I then added the amber oil and stirred for a minute to make sure it was well incorporated.
Using this just after a shower or bath keeps my skin velvety soft longer than lotion and I use less of this than lotion for a fraction of the price of the super moisturizing lotions I have bought.
It smells like a peanut and beeswax but after it absorbs into the skin you are left with the amber fragrance.
If you don't want peanut oil this recipe should work with just olive oil.
This recipe also serves well as a pomade or brilliantine for hair. I have very long hair and I do not like to use conditioner. I apply this lightly to the ends of my hair for softness and shine.
The caption reads:
“O, Mummy dear, why did Papa say he was thinking of having you painted by Sir John Millais? I'm sure he couldn't do better than you do it Yourself. ”
“Ethel, dear, I think you had better go play in the Nursery with your little Brother!”
As far as cosmetics go there really wasn't much to choose from back then. You had face powder that was either talc or a starch and for rouge there was carmine [insect derived red pigment] or plant pigments such as beets or that from petals, that was added to salves or balms made from lard or tallow to use on lips and cheeks.
The eyeshadow [lead powder] or white pigmented face creams where still toxic & most considered they were only to be worn by actress's or prostitutes. As Queen Victoria was not fond of cosmetics that dutifully trickled down through her loyal subjects and plebes.
I've read some used burnt match sticks for eyeliner which is essentially charcoal.
links for research:
beautifulwithbrains.com
thevictoriangarden.co.za
the-cup-that-cheers.blogspot.com
fashion-era.com
erasofelegance.com
victorianpage.com
Speaking of skills devalued by mechanization, how about homemade cosmetics and skin care
I've been looking into making soap & skincare.
Here I have made some "handwax" for my dried up overworked hands. After I wash dishes and my hands are still warm I pick up the bar and rub it about a little then rub the rest into my hands. There's no drying alcohols like in liquid lotions and it stays on my skin keeping it soft longer.
ingredients: beeswax, shea butter, clarified butter, olive oil, and coconut oil {96 degree melt}
This is a very forgiving recipe so exact amounts are not necessarily important, the ingredients are listed according to how much was used, first listed was the largest amount, last listed was the smallest amount used, etc.
[Yes I used clarified butter, people use milk in soap so I figured why not use clarified butter in a lotion bar. Besides it does not go rancid like all natural oils/waxes.]
Searched for two weeks before I purchased my ingredients, found this seller on bonanza.com to have the freshest ingredients and the lowest prices. www.bonanza.com/booths/countrysoapshack
Here is the lotion bar "handwax" coming out of it's mold
I keep my handwax bar in an old Altoids tin.
My 'NotVaseline' recipe
1 3/4 cup cold pressed olive oil
1/4 c. unrefined peanut oil [natural source of Vit E for skin health]
1/2 c. beeswax
amber oil
I heated the beeswax and oils [not the amber oil] for about 10 minutes stirring. Warmed the amber after pouring my 'NotVaseline' into the jar I then added the amber oil and stirred for a minute to make sure it was well incorporated.
Using this just after a shower or bath keeps my skin velvety soft longer than lotion and I use less of this than lotion for a fraction of the price of the super moisturizing lotions I have bought.
It smells like a peanut and beeswax but after it absorbs into the skin you are left with the amber fragrance.
If you don't want peanut oil this recipe should work with just olive oil.
This recipe also serves well as a pomade or brilliantine for hair. I have very long hair and I do not like to use conditioner. I apply this lightly to the ends of my hair for softness and shine.
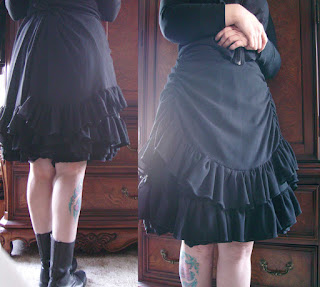
Victorian childrens mourning skirt with ruched apron overskirt
I was inspired by these girls Victorian mourning dresses to make these skirts.
I used the same a line pattern just lengthening one skirt slightly longer than the next.
They can be worn separately or together and as underskirts as seen here with a ruched crepe overskirt-apron.
Preshrunk wool for skirt panels.
Preshrunk crepe used for ruched apron and skirt ruffles.
Here you can see I used a simple a line skirt pattern and just added 1 tier of ruffles to the hem for that "Victorian" effect.
I added additional faux seams to the shorter top skirt to make it appear to be a 7 gore skirt. You will have to forgive the cat hair! ;) lol
I made the over-skirt into an apron with ruching & simply left the zipper seam open all the way to the hem to turn it into an apron, and making the bias tape waist band longer to create the ties for the apron.
For a video tutorial for applying elastic to create ruching on a skirt check out: Evange's tutorial for a lolita/hime skirt
This is the simple pattern I used for both the overskirt and the underskirts, it doesn't even have darts. Its pieces 1 & 2. There is so much you can do with this pattern.
Make bloomers without a pattern
Evange's no pattern bloomers "pattern" is easy and the bloomers are comfortable and create body to add fullness to your skirt.
It took me maybe 1 hour to make them.
I made one small alteration to Evange's tutorial.
I added ruffles at the knees as you can see here.
So instead of having just elastic casing at the knees I added another inch, made a 3/4 ish inch casing for narrow elastic and added that to make ruffles. See the end of post for details to do this alteration.
Just follow Evange's instructions until you get to the knee hem and add my alteration for easy decorative ruffles.
Subscribe to:
Posts (Atom)


